But you are more interested in this installment of the blog. So here we go.
Previously on 'A brush, a paint and a mini': I typed about not being able to give you a proper update with good pictures. Before that i covered the assembly and posing of what I assume is your very own Juggernaut miniature. And after a long wait here is a nice update with pictures to boot.
And now for the post.
Special thanks to Cat , for agreeing to help with the pictures for the blog. That and all of the questions, the answers to which become the content of this blog. Remember, I am trying to make things easy for the beginners to enjoy the hobby as well as share my experience and tips that I have picked up through out the years. Some of it is useful to even the grizzled and haggard veterans of the table top miniatures hobby. Everyone likes to have a well painted army. Or at least one that looks good.
Here is Cat:
 |
| Cat and Denegra, |
So then we move on to the meat and tubers portion of the post. And as per the precedent set in blogs past, a brief intro to the tools used along with what are hopefully witty warnings.
As there will be a brief recap on cleaning we will be needing the help of our trusty and dangerous friend the hobby knife:

Did my previous warnings about this tool sink in yet? I am serious, even a dull blade can cause deep cuts. You should always use a sharp blade. This is because an individual is always more careful around sharp pieces of metal and sharp blades cut easily through the material you are working with.Next we have our trusty Clippers.

Warning!: These are a pinch hazard. That and anything you clip off with them may fly in a random direction at a surprisingly high velocity. Use caution and preferably eye protection. Your eyes will thank you.Then there are the files. These are, like a hobby knife, the mainstay of a hobby work area's organization chart. very useful for smoothing out mold lines and feeds as well as removing unwanted details. And as I will cover in future posts, shaving/ filing a part down for a better fit.

 | |
| I call it blu-tack. Its a non-permanent adhesive putty. | . |
And we have another familiar, though not as celebrated friend. The sticky tack. This really is the unsung hero of our hobby. Honest. I have yet to hear any songs about it. Or even read the lyrics of songs, and i have been around people who will sing about anything.
Wow its almost 6am.

Now that the Pin vice has been mentioned. I will Bring up the Primer. Probably what you have been waiting for. Primer is important since it adheres to metal and plastic (well good primer does), and it provides a base with the surface area for paint to stick to. The type of primer that I chose is a formula for automotive use. I will explain later. There is much to cover.

Ah almost forgot. Warning!!!: Primer contains some very toxic solvents. Use in a well ventilated area. Preferably outdoors. Spray away from yourself and take breaks between sprays. I suggest wearing a respirator if you can get one. The solvents, and possibly propellant, may cause damage to the following systems: Brain, heart, liver, lungs, kidneys. Do not inhale for the fun of it. Do not eat!Moving on.
Since we already assembled the Juggernaut I will give you a brief recap using the Destroyer. If you purchased a different starter box. No worries, we have you covered as most of what applies here applies to the other boxes.

 |
| Illustrating my point about bloodthirsty knives. |

After all of that cutting some parts may need a little bit of extra polish. that is where the files come in. just don't press too hard on them. Now you are probably wondering which file is best for the job. To answer that i will have to call your attention to the shapes of the files themselves. Files with broad flat surfaces are best used for flat or convex surfaces. The more rounded files fit better into the convex areas. The thin squarish and round needle files are best for some of the tighter areas where a wider file may not fit. Its a judgment call really. If you need to clean them, just press them into a kneaded chunk of sticky tack.
And Just as we did with the Juggernaut its time to do a bit of posing. This step isn't necessary, but its fun to play around with the poses.
That said, in this post I will be covering the two different methods of priming models. I have used both methodologies and will cover both. First lets chat about them. One method of prepping a model is to clean off all of the flash, scrape off any material that the knife missed with a file. Pose the model and then glue it together. As I may have mentioned before, this is helpful as when you are painting the model you will have a better idea where the shadows and highlights go. The downside is that, where the shadows go its hard for you to reach with a brush (though not impossible) and the same applies for primer. This translates into extra effort on your part.
And since our Juggernaut/ unspecified Warjack of your choice is assembled and ready. Lets prep it for primer. This is a simple process. Well I think it is. First you will need to have either some brass rod or paperclips handy. Then, you will need to take one and push it into a block of sticky tack. This is for safety as I have had way too many things fly around my work area.
 |
| Pressing a paper clip into the blu-tack. |
Next is time for the clippers. Holding onto the "loose" end of what in my case is a paperclip. I gently squeeze the handles of the clippers until the blades cuts through the metal. the same applies if you are using brass rod. I can't tell you how many times I have seen a length of brass rod shoot across the room barely missing people. Invariably the question arises. How long should the pin be? Well for our purposes about an inch should do. For those of us who grew up on metric: 2.5cm
 |
| its always important to get a grip on both sides of the brass rod/paper clip as you are about to cut it |
 |
Do you have it now? Good. Next we have to drill a hole in to the foot of the Juggernaut so as to glue the pin to it. We will need to make sure that there is a snug fit and so we have to match the drill bit, yes its a drill bit, to the pin's width like so:
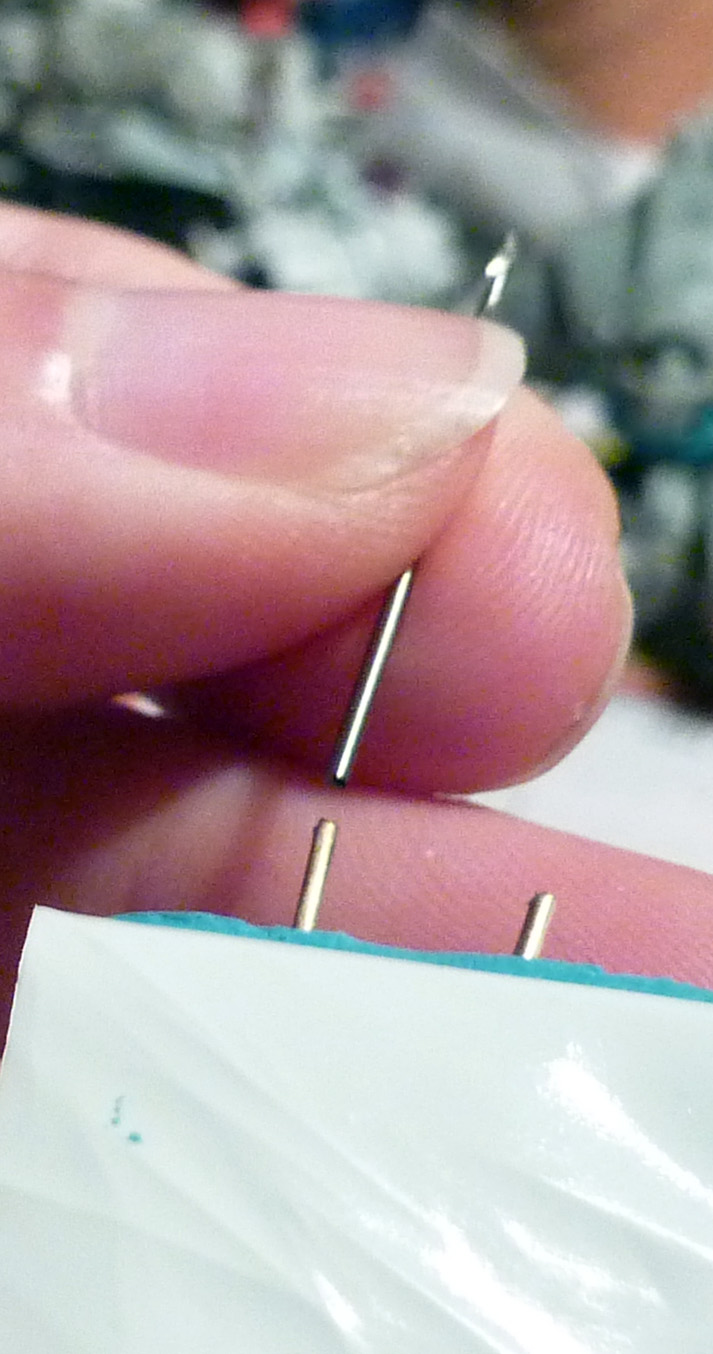
The drill bit should be only slightly wider than the pin you will be using. from a distance they will appear to be the same width/ diameter. Once you have found the right bit for the job secure it in the pin vice and you are ready to drill a hole.

Once the hole has been drilled. It is time to insert the pin. Simply take your pin, test fit into the hole and see how far it goes. Once you get a sense of that, take your bottle of super glue and apply a little bit to the part of the pin that will go into the hole. A little bit of super glue goes a long way. A lot, sticks your fingers to the model and possibly the table.

It wasn't that hard, was it? Now that you have the pin glued to the foot, it's time to find a suitable object to act as a handle. Most pro painters advise the use of wine corks. This is mostly as a matter of convenience. Most of them are old enough to buy wine, or beverages that are distributed in glass bottles topped with a cork. The material is soft and spongy, so it is easy to push a pin into it. And yet it can support the weight of even a metal version of our Juggernaut. I should know I have tried it.


This is Sorcha. She is the warcaster that came with the starter box. As her sculpt is fairly straight forward I decided to assemble her before priming. with smaller models it sometimes makes sense to assemble and attach to the base before priming. For her handle I decided to use the cap form an old glue bottle that i had lying around. but first I need some putty to make her stick...


Now I take Sorcha and press her base onto the cap with the sticky tack sandwiched between them.

Well that seemed easy. And now we prime. Of course you should probably wash your models with hot soapy water and leave them to dry. Drying time takes about 24hrs just to be on the safe side. It may take longer depending on the ambient temperature and humidity. 50-60F should do nicely. So then we can prime? Yes. but first a little prep. I recommend finding a nice and well ventilated place to do this step. Primer fumes are not good for you, and they are a flammable. So you should be away from any open flames or sources of sparks. You will also want to be outside, as this stuff smell s bad and will make you feel ill if you spray it indoors. In other words: Don't inhale the vapors/ fumes. Found a place? Good. Miniatures dry? Excellent.
 |
| Made you look. Muahahaha |
What's the glove for? I put on a pair of cheap rubber gloves so that i don't have to wash primer from my hands. You don't have to, but after you spend an hour trying to wash primer off of your hands you will see the wisdom of wearing gloves.
 |
| Do not try this at home. We used Photoshop. |
<==== The WRONG way to use your primer.
 |
| That's right. Spray the miniatures. |
The Right way to use primer! =======>


Here is Sorcha and the Juggernaut. They aren't ready yet, as I will need to give them one more coat just to make sure that hey are fully primed. After that it will take about three days for the primer to cure. longer if it the winter temperatures remain below 40F.
A quick note on the primer that I use. First it is an automotive primer. The brand is Duplicolor by Krylon. this is a US brand and as such I am only aware of where to look for it in the US. I f you want to save yourself some time but are willing to pay a little extra go buy the P3 primer. I can't tell you what the actual formula is or who makes it, but I have been informed by some very reliable sources that it works just as well. I trust my source enough to say that. I will however try a can to see how it compares.
So now lets check on the other method for priming models. The un-assembled way. This is a fairly straight forward method. You clean your pieces just like the juggernaut . Except that instead of assembling it you just cover the contact areas with tape. The contact areas are the parts of the model that will be glued together. Its where you will be applying glue.
TIP!: I once made the mistake of priming plastic models with out covering the contact areas. This resulted in me having to spend hours scraping primer and gummed plastic cement off of those areas so that the new layer of plastic cement could activate and bond the pieces together.


All in all which method you choose is up to you. for the most part you are only limited by the mood that suits you at the time. Some models may necessitate to them fully assembled. And a few will be best primed in pieces. but that is up to you.
Tune in next time for the base coat. When I will be discussing basic color choices, the color scheme I chose, indispensable paints, brushes and what matte medium is.
No comments:
Post a Comment