Sorry about the delay for an update. I ran into some difficulty getting the pictures ready for editing. The process takes an incredible amount of time, as my computer doesn't have a built in memory card reader and I didn't get the USB cable with the camera I borrowed. Transferring the images aside, it can take 3-6 hours for selection and editing. Then there is the composition of the blog and general formatting of the text and positioning of those pictures that do so much to illustrate what it is that I am talking about. That said I was also invited to spend the night at my girlfriend's place where I don't have a Windows machine to work on. Yes, I am a PC and my girlfriend is a Mac. Moving on. So now I am back, sort of, and typed out this post to tide you over until we get some more pictures for the next part. Which, of course, deals with the fun and excitement of priming your models. I will also cover two of the ways to approach the primer and painting process before moving on to the actual painting itself.
So to satiate your modeling appetite for the moment. Here is a brief on primer.
There are two schools of thought on how to prepare your models for primer.
One set believes that you should assemble and glue your model together and then glue to the base before priming. This is a space efficient way of doing things. As you only have to hold one object in front of the can. It does, however, have its draw backs in the form of primer shadows. These are the areas where a part, say an arm, covers another part. Like the torso. I will show you pictures later.
The other school of thought on the matter, believes in the simplicity of priming your model in pieces. Not necessarily un-assembled, as the process is made easier with a little sub assembly. This way you avoid the afore mentioned shadows. Get near perfect coverage, and have an easier time painting your model. There are drawbacks. Hah, you didn't think that this is was a perfect method, did you? If you use this method you get a Near perfect coverage of primer. In fact you get a better coverage on all of your parts than the fully assembled model. This means that you would need to carefully plan how to assemble and pose your model and stick tape to the relevant contact areas. I will cover that in greater detail in the next entry. Also there is the painting aspect. On a fully assembled model you get a fairly straight forward view of where shadows fall and where to put your high lights. With this method, you would have an easier time applying the base coat i.e. the basic colors. You would have to assemble and glue your model together to apply the finishing touches such as shading and highlights. Needless to say, or perhaps needed to mention. This is a very time consuming method. And yes, the pros use this method. I have observed Privateer's own Ron Cruzie and Matt Di Pietro paint using this method. Pictures to come in the next post.
All this is well and good but where are the pics? Well here are two:
This is what i see out the window right now.
This is yet another blog about the miniatures hobby. I chose to make it as friendly for beginners as possible. Here I will cover the tools, paints, primers, tips as well as conversions.
Total Pageviews
Tuesday, November 23, 2010
Thursday, November 11, 2010
Starting out. part III
Previously on "A Brush, a Paint, and a Mini": I typed about cleaning your model. Specifically the tools, inherent danger and how they apply to a plastic model. I will also cover tool use on metal models in the future.
So now it's time for a new post. And with out much ado I would like to introduce to you a new member of our Slow Burn league. (drum roll)
Matt! This gentleman or fiery zealot is the author of Faith and Flame. What I presume, to be a blog about one man's journey into the faith and glory that is the Menite faith. I have added a link to his blog on the right. In the box appropriately titled "links".
Now then. On with the blog.
So I typed about the various tools to use for cleaning your model. Which I conveniently assume to be a plastic Juggernaut. Now I will tell you.... write... type about posing your model. In fact the entire assembly process from pre-assembly to glued. This is actually not a difficult process and is only time consuming if you have a hard time choosing a pose. And, or have decided to use a plastic cement, aka plastic glue, in a cold room. Oh yeah. I almost forgot. I will be covering the two main types of glue. The pros, and the con's. For those of you that are interested in that sort of thing. Let's get started shall we? Good.
So first I will cover the tools that we will be using along with pictures. As is customary in this blog. I find that if I show you what it looks like. You will have an easier time finding the tool in question. Please pay attention to the warnings that I add. They are there for your safety, convenience (It is in fact very convenient to enjoy the hobby from the comfort of your home and not the emergency room. Just saying)
Ok. Tools that we will be using.
First we have our trusty knife:
It's that odd looking square blue thing. And just to be sure, I picked blue because that was on the local store's shelf. You can pick whatever color you like or your local office supply store has available. This is a nontoxic material. However, I wouldn't eat it.
And last, but certainly not least. I f you want to glue the thing together that is. Is, well, the glue. Two types really. Plastic cement and super glue.
In the pictured examples we have Testors brand plastic cement and Zap-A-Gap brand super glue.
Much can be said about glue. I, however, will limit myself to when it is best to use each type of glue.
First the above mentioned plastic cement.
The most common, at least in my experience. Is manufactured by/for the Testors corporation. I have encountered it in three forms. Red tube: in all its unhealthy, but fairly quick curing glory. The red tube formula contains brain cell killing methyl ethyl ketone that make a person dizzy.
Next is the jar pictured above. It's a liquid version. It contains the same Metyl Ethyl Ketone as the red tube. It also comes with a convenient brush applicator. And then there is the lemony scented blue tube. It is the non-toxic version of the red tube plastic cement.
Now then, when do you use it and why? Well I prefer to use plastic cement on my plastic miniatures. Plastic cement doesn't cure like super glue, an advantage if you have a very humid environment. Or a not so humid one. This is mostly because the glue itself doesn't crystallize, but melts the plastic and allows it to fuse together. Much like welding metal. The cure time is slower and allows for final reposition of part without ruining the bond.
Super glue, on the other hand. Sets fast. In fifteen seconds you are ready to play or glue another part. This works because superglue reacts with moisture in the air to create a crystalline structure that bonds both surfaces. Now the drawbacks: a) Superglue was developed for the US army to use as a quick field dressing before wounded were sent to MASH units. As such, superglue is better at bonding your skin to itself than any other material. (I type from experience here). b) In most cases you will have to score the surfaces that you are attempting to bond. To give the glue a better surface area to adhere to. This invariably introduces the cutting hazard that comes with a knife, bloodthirsty or otherwise. (Though, I suppose you could glue your self together with superglue. I don't recommend it. consult a doctor first if you want to prove me wrong). and c) superglue bonds are, depending on the amount of moisture introduced, brittle. This can be an advantage if you want to break apart a model and after a lot of cleaning off of glue. Reassemble it with a pose that is more to your liking. On the flip side a properly cured bond is very, very strong.
I should also mention that these glues, due to the very nature of the solvents involved, should not be used for hours long assembly marathons. Take breaks, get some fresh air.
So now then, you have the glue all ready. The, I assume, Juggernaut cleaned and ready and your sticky tack within reach. You are probably trying to decide which glue to use. Not to worry. We start with the Sticky tack, but first we have to knead it for a bit.
Its a simple process. Just pull out as much as you want and start by squishing and stretching it until it feels
warm. The kneading process allows the sticky tack to absorb some of your body heat from your hands.
This is a good thing as it causes the tack to become more pliant. And thus easier to manipulate and attach to the pieces that you want to assemble. A lot of work eh? It's worth it in the end, trust me.
It should be ready when it no longer feels cold to the touch.
So now that we have softened up our sticky tack. It's time to apply it to the model. As you can see below I have already done so.
The part that you don't see, is the top of the waist/hip part. Its where the upper torso and the lower torso attach so that the Juggernaut can stand. I have added a liberal amount of putty there. Now we are ready for pre-assembly and by extension posing.
In the above images I am pressing the pieces together so that the tack can hold them in place enough for me to pose the model. Don't worry if it doesn't stick together for long. All you need to do is get a good sense of what it will look like when you glue it together. And to keep parts from falling off you may need to add more tack. Once you have your model 'puttied' together, at least enough for parts not to fall off if you look at them funny. Then you can begin the fun bit. Posing it of course. This is where a camera can come in handy.
The four pictures above are the poses and variations that I tried out. Keep in mind that the final pose should be one that makes you happy. And always make sure that you look at your model from different angles. This is for your own benefit. Remember it's your model, pose it the way you like. I chose the look of the above picture. And so I proceeded to reach for the glue....
Before i get too far ahead of myself there is a little bit of preparation first. And that is to 1) memorize the general pose that I liked. It will look a little different after the sticky tack has been removed. 2) I have to remember to remove the sticky tack from the parts to be glued. Always important to glue together the parts that you want glued together. And of course 3) pick a glue. I chose to try that glass jar of plastic cement. After all I have used the tube packaged version before and that worked in the past.
And here I apply a little to the legs. Well the parts of the legs that fit into the hip joints.
That worked well, so I attempted to try it on the hands. However I didn't pay attention to the ambient temperature, not to mention that this stuff is as viscous as water. Its really watery.
So to improve the bond-ability I scored the surfaces that were to be joined:
Unfortunately for me the cement didn't work as well this time. Maybe there was too much of a gap between the parts. Hard to see such things when you are holding them together. So in the interest of time, a timely update and my health (The plastic cement fumes were starting to get to me). I reached for the ZAP-A-GAP. Having used a variety of super glues in the past I have to say that ZAP-A-GAP has a well deserved reputation. And of course the safety tip:
And after gluing with a few minor edits to the pose I have this:
It looks a lot better in real life. So that concludes this post.
But that leaves me with a bit of a problem. Do I now move on to painting this guy or do I do an assembly tutorial on the Destroyer and Sorsha. The other two models from the starter set. Decisions, decisions....
PS
A little legal superstitious stuff to keep cease and desist orders away:
Privateer Press, Warmachine, Khador, Formula P3 and associated logos are trademark properties of Privateer Press, Inc. 13434 NE 16th St., Suite #120 Bellevue, WA, 98005. All rights reserved.
ZAP-A-GAP is a registered trademark of PACER TECHNOLOGY, LLC, Rancho Cucamonga, CA 98730
Testors is a registered trademark of The Testor corporation, Rockford, IL 61104
So now it's time for a new post. And with out much ado I would like to introduce to you a new member of our Slow Burn league. (drum roll)
Matt! This gentleman or fiery zealot is the author of Faith and Flame. What I presume, to be a blog about one man's journey into the faith and glory that is the Menite faith. I have added a link to his blog on the right. In the box appropriately titled "links".
Now then. On with the blog.
So I typed about the various tools to use for cleaning your model. Which I conveniently assume to be a plastic Juggernaut. Now I will tell you.... write... type about posing your model. In fact the entire assembly process from pre-assembly to glued. This is actually not a difficult process and is only time consuming if you have a hard time choosing a pose. And, or have decided to use a plastic cement, aka plastic glue, in a cold room. Oh yeah. I almost forgot. I will be covering the two main types of glue. The pros, and the con's. For those of you that are interested in that sort of thing. Let's get started shall we? Good.
So first I will cover the tools that we will be using along with pictures. As is customary in this blog. I find that if I show you what it looks like. You will have an easier time finding the tool in question. Please pay attention to the warnings that I add. They are there for your safety, convenience (It is in fact very convenient to enjoy the hobby from the comfort of your home and not the emergency room. Just saying)
Ok. Tools that we will be using.
First we have our trusty knife:
![]() |
| A P3 hobby knife. |
Warning!!! A hobby or scalpel knives are VERY sharp. And should be. I advise using sharp blades as it easier to cut things with. However they can easily cut you as well. So use care and pay attention to what it is that you are doing when using these. Always replace the safety cap when you are not using the knife. Just in case. Accidents can happen, lets try to keep all of our fingers and toes attached and avoid the proverbial 1-10 stitches.Next we have the unsung hero of many a modeling jobs and conversions. The sticky tack.
![]() |
| Pictured here with the cleaned Juggernaut. |
And last, but certainly not least. I f you want to glue the thing together that is. Is, well, the glue. Two types really. Plastic cement and super glue.
![]() |
| Testors brand plastic cement. |
![]() |
| The Wrong way to use Super glue. Or any type of glue for that matter. |
![]() |
| The right way to use glue. |
Much can be said about glue. I, however, will limit myself to when it is best to use each type of glue.
First the above mentioned plastic cement.
The most common, at least in my experience. Is manufactured by/for the Testors corporation. I have encountered it in three forms. Red tube: in all its unhealthy, but fairly quick curing glory. The red tube formula contains brain cell killing methyl ethyl ketone that make a person dizzy.
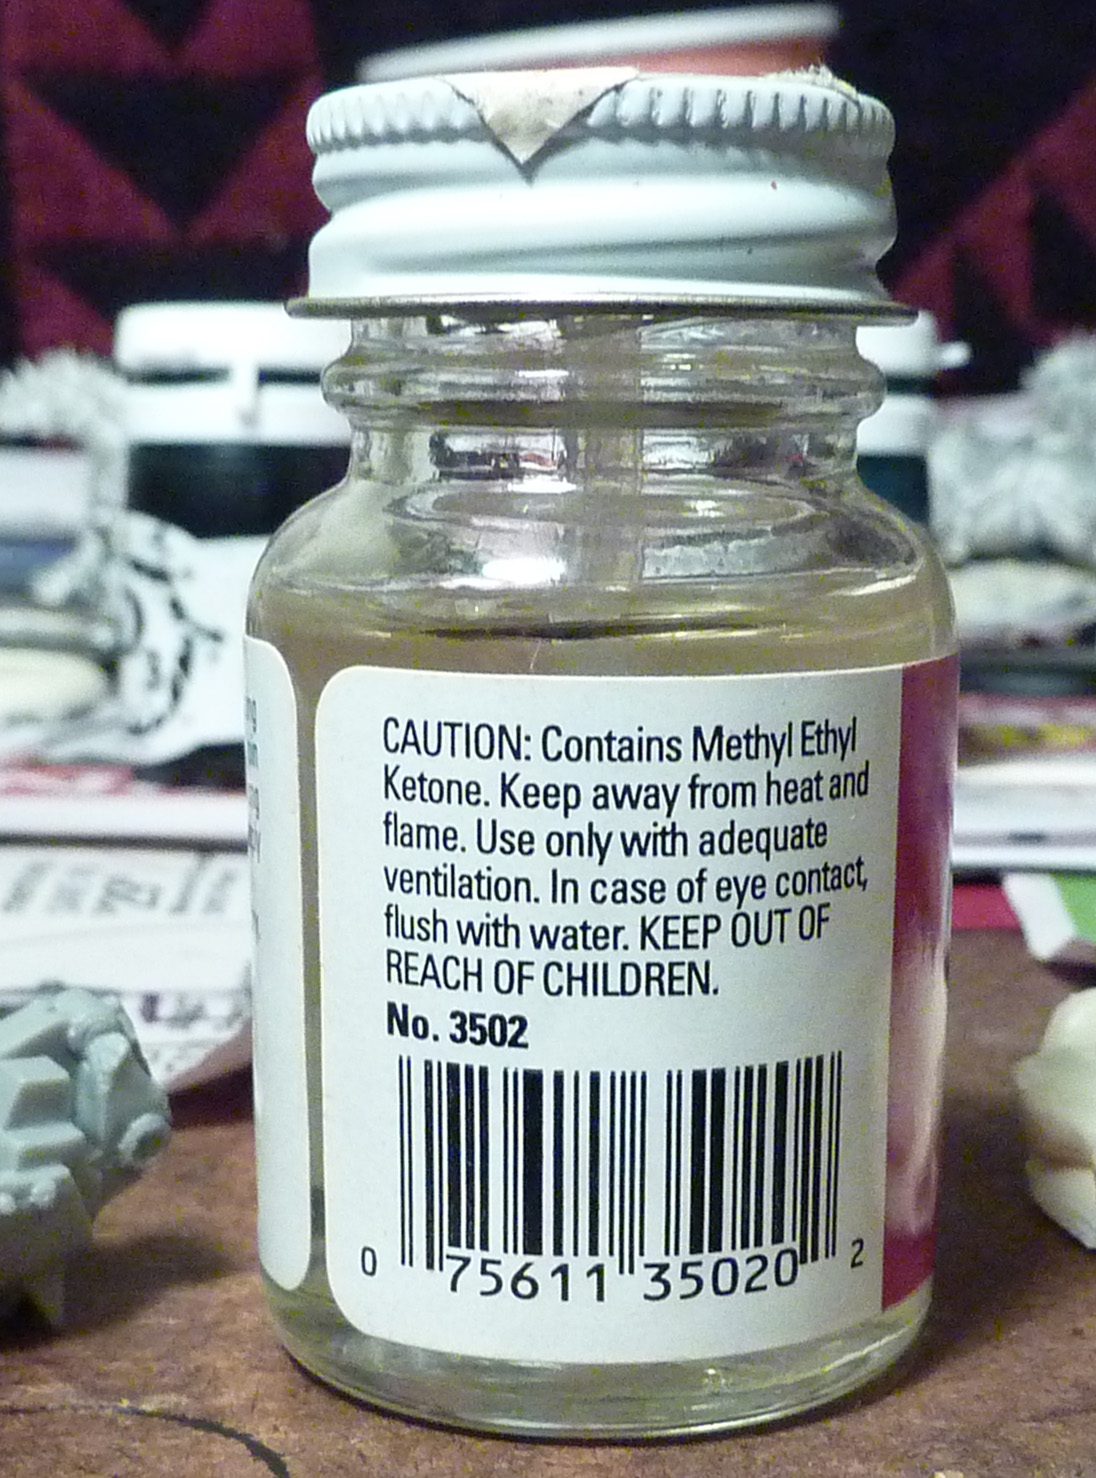
Next is the jar pictured above. It's a liquid version. It contains the same Metyl Ethyl Ketone as the red tube. It also comes with a convenient brush applicator. And then there is the lemony scented blue tube. It is the non-toxic version of the red tube plastic cement.
Now then, when do you use it and why? Well I prefer to use plastic cement on my plastic miniatures. Plastic cement doesn't cure like super glue, an advantage if you have a very humid environment. Or a not so humid one. This is mostly because the glue itself doesn't crystallize, but melts the plastic and allows it to fuse together. Much like welding metal. The cure time is slower and allows for final reposition of part without ruining the bond.
WARNING!!!: Do NOT DRINK GLUE! Despite the fact that I appear to be taking a rather large swig of ZAP-A-GAP. This was done with the magic of modern photography to illustrate the right and wrong way to use your glue. YOU SHOULD NEVER, EVER INGEST PLASTIC CEMENT OR SUPER GLUE! BAD, and I do mean BAD, things will happen. Not may, but Will.There are draw backs, however. And they are not to be taken lightly. First and the lightest, is the cure time. Super glue sets in a matter of seconds, usually about 15, and is completely cured within 30 seconds. Plastic cement on the other hand requires patience. About 30 seconds for a basic bond, and 2-6 hours for a complete cure (depending on brand, temperature and formulation). The other factor to take into account is toxicity. Yes some glues are non-toxic like Elmer's white glue, but plastic cement tends to be. Methyl Ethyl Ketone is one of the ingredients of plastic cement. It's the glue's solvent. In small amounts it smells unpleasant, can give you a headache. Long exposures lead to nausea and some brain damage. Always use in a well ventilated area. In addition this glue's cure time is dependent on ambient temperature. It works really fast at 60-70F, but at lower temperatures it takes longer and longer to set. Keep that in mind as not all places are that warm at all times of the year.
Super glue, on the other hand. Sets fast. In fifteen seconds you are ready to play or glue another part. This works because superglue reacts with moisture in the air to create a crystalline structure that bonds both surfaces. Now the drawbacks: a) Superglue was developed for the US army to use as a quick field dressing before wounded were sent to MASH units. As such, superglue is better at bonding your skin to itself than any other material. (I type from experience here). b) In most cases you will have to score the surfaces that you are attempting to bond. To give the glue a better surface area to adhere to. This invariably introduces the cutting hazard that comes with a knife, bloodthirsty or otherwise. (Though, I suppose you could glue your self together with superglue. I don't recommend it. consult a doctor first if you want to prove me wrong). and c) superglue bonds are, depending on the amount of moisture introduced, brittle. This can be an advantage if you want to break apart a model and after a lot of cleaning off of glue. Reassemble it with a pose that is more to your liking. On the flip side a properly cured bond is very, very strong.
I should also mention that these glues, due to the very nature of the solvents involved, should not be used for hours long assembly marathons. Take breaks, get some fresh air.
So now then, you have the glue all ready. The, I assume, Juggernaut cleaned and ready and your sticky tack within reach. You are probably trying to decide which glue to use. Not to worry. We start with the Sticky tack, but first we have to knead it for a bit.
Its a simple process. Just pull out as much as you want and start by squishing and stretching it until it feels
warm. The kneading process allows the sticky tack to absorb some of your body heat from your hands.
This is a good thing as it causes the tack to become more pliant. And thus easier to manipulate and attach to the pieces that you want to assemble. A lot of work eh? It's worth it in the end, trust me.
| ||
| All tacked up. |
It should be ready when it no longer feels cold to the touch.
So now that we have softened up our sticky tack. It's time to apply it to the model. As you can see below I have already done so.
The part that you don't see, is the top of the waist/hip part. Its where the upper torso and the lower torso attach so that the Juggernaut can stand. I have added a liberal amount of putty there. Now we are ready for pre-assembly and by extension posing.
In the above images I am pressing the pieces together so that the tack can hold them in place enough for me to pose the model. Don't worry if it doesn't stick together for long. All you need to do is get a good sense of what it will look like when you glue it together. And to keep parts from falling off you may need to add more tack. Once you have your model 'puttied' together, at least enough for parts not to fall off if you look at them funny. Then you can begin the fun bit. Posing it of course. This is where a camera can come in handy.
The four pictures above are the poses and variations that I tried out. Keep in mind that the final pose should be one that makes you happy. And always make sure that you look at your model from different angles. This is for your own benefit. Remember it's your model, pose it the way you like. I chose the look of the above picture. And so I proceeded to reach for the glue....
Before i get too far ahead of myself there is a little bit of preparation first. And that is to 1) memorize the general pose that I liked. It will look a little different after the sticky tack has been removed. 2) I have to remember to remove the sticky tack from the parts to be glued. Always important to glue together the parts that you want glued together. And of course 3) pick a glue. I chose to try that glass jar of plastic cement. After all I have used the tube packaged version before and that worked in the past.
![]() |
| This convenient warning label should be read before using the cement. |
![]() |
| The brush is actually a part of the jar's cap. |
That worked well, so I attempted to try it on the hands. However I didn't pay attention to the ambient temperature, not to mention that this stuff is as viscous as water. Its really watery.
So to improve the bond-ability I scored the surfaces that were to be joined:
Unfortunately for me the cement didn't work as well this time. Maybe there was too much of a gap between the parts. Hard to see such things when you are holding them together. So in the interest of time, a timely update and my health (The plastic cement fumes were starting to get to me). I reached for the ZAP-A-GAP. Having used a variety of super glues in the past I have to say that ZAP-A-GAP has a well deserved reputation. And of course the safety tip:
Warning!: Superglue vapors are an eye irritant. Avoid, and by that I mean Don't, point the bottle towards your eyes. Avoid sniffing the bottle's nozzle. Use good ventilation, like an open window or two. Avoid getting it on your hands as it will bond your skin. And try not to get it on your clothes and the carpet. It actually causes an exothermic reaction when that happens. Again I speak from experience on that one. Luckily I didn't drop any on the carpet.
And after gluing with a few minor edits to the pose I have this:
It looks a lot better in real life. So that concludes this post.
But that leaves me with a bit of a problem. Do I now move on to painting this guy or do I do an assembly tutorial on the Destroyer and Sorsha. The other two models from the starter set. Decisions, decisions....
PS
A little legal superstitious stuff to keep cease and desist orders away:
Privateer Press, Warmachine, Khador, Formula P3 and associated logos are trademark properties of Privateer Press, Inc. 13434 NE 16th St., Suite #120 Bellevue, WA, 98005. All rights reserved.
ZAP-A-GAP is a registered trademark of PACER TECHNOLOGY, LLC, Rancho Cucamonga, CA 98730
Testors is a registered trademark of The Testor corporation, Rockford, IL 61104
Thursday, November 4, 2010
Starting out. part II

So this is Starting out round two. Or episode two.
Previously in this blog I gave a quick overview on the tools and setup necessary for painting miniatures. Then I moved on to cover the convenience of starter sets and a quick plug for Privateer Press. Both for their miniatures lines and their P3 line of tools and paints. The latter of which I prefer above other lines.
Before I get started, I would like to introduce you to Bill. Bill is the local Press Ganger and the generalissimo of the Dragonslayer slow grow league. I call it the Slowburn league.
Now then. You got your miniatures. I presume the plastic starter set for your faction. If you got a metal set don't worry as I will be covering metal miniatures soon.
For this post I will cover the cleaning of the Juggernaut. I would try to hurry things along. However, I require the aid of Cat (pictured in previous post) to take the pictures that make this blog a little more interesting to read. Hopefully I will even post videos, but that requires a lot more effort and a video camera. I am working on it.
Now then technical and technological rants aside lets get to cleaning that Juggernaut.
I assume you bought that Khador Starter set. If not, no worries, the cleaning procedures still apply. For this session we will need the following tools:
- Pen knife or scalpel. Possibly X-acto, but that is up to you.
I cant say this enough. Be CAREFUL with these knives!!! The blades are very, very, very sharp. And for that reason they can cut you without causing pain. I would hate for someone to bleed to death ( I am exaggerating. I hope). - Files. For plastics I recommend steel cut files. brand is unimportant. Though I had good experience with the Testors Modelmasters set. Very versatile and good on plastics and metal.

- And of course the unsung hero of modelers, painters and electricians. Clippers also known as wire snips or cutters. The P3 ones I recommend as they can cut through brass rod. I haven't tested them on paper clips yet. (Paper clips are a good way to find out if you bought a good set of clippers. Considering how much they cost I always recommend buying a set that can cut through a paper clip with ease.)
And the warning: Be very CAREFUL with these. This tool is both a cut and pinch hazard. Not only that, but the parts that you are clipping off can fly at unexpected velocities and cause serious injury. Like poking an eye out.
Sorry the clippers are trying to clip. ( Computer graphics humor.No? )
And here is our first model the Juggernaut:
As you can see our Juggernaut is straight out of the box and in pieces. That and there are these ridges that seem to run across the pieces and the main body also has knob sticking out of it.A brief explanation: The ridges are called mould lines. They appear where the two halves (in the case of a two part mould. Some mould have more parts) come together and are caused when material leaks out or is squeezed through. In metal miniatures this is because of the centrifugal force exerted on the metal during the spin casting process. In plastics and resins its because of the pressure of the injection casting process. Thermoplastics as i believe the case is here are cast like metal. The knob i mentioned earlier is either the main feed to the part or an extra large vent. More than likely its part of the feed that allows the mould cavity to be filled with the casting material. in the case of metal miniatures you will more than likely find the metal that got into the vents. these were cut into the mould to allow for air to escape the cavities.
Now lets start clipping our way to a clean model.
First we need to use the clippers for the feeds and any large amount of flash that needs to be removed. You can use a knife instead, but trust my experience on this. Clippers make the process go faster
.Flash: What is it? Well most of us currently recognize it as a web development tool by Adobe. In the case of miniatures it is the material that is not a part of the model that you are working on. It's presence is a byproduct of the manufacturing process and can be used to gauge the skill of a caster. The more skilled a caster the less flash the model has. Speaking from personal experience we have ways to reduce flash. Flash for the purposes of this blog includes vents, metal the sticks out along the mould line and feeds. I will show you more examples in the future.Now that we have clipped the Feed off. Lets clean it up a bit with the knife to level the part and ready it for smoothing with a file.
It's worth mentioning that my methods were learned from articles that I have read and questions that i have asked professional painters. Painters such as the studio pros at Privateer Press and some of the painting competition winners.As an aside you should check out McVei studios, and read Mike's blog. He is a really cool guy, I even got to ask him some questions which he was very gracious in answering. I will add the link to Studio McVei soon. I will be on the side of the blog with the other links.
Moving along.
Now we go to filing the pieces. Although in some cases it is more expedient to use the knife. The following pictures illustrate what I did.
Hint: If you bought a large pack of files. (Not a bad idea. Really!) You will have various shapes and sizes. To make things easier for you and not take up too much space I will just give you the general principles involved. Use large flat files for smoothing large flat areas of a model. This will usually be the feet or flat parts that need to be joined. The round files are useful for cleaning the curved sections of a model. Believe me when I say this, you will use most of your files. the small square and triangular files get into places that the larger files can't fit in. Using the large files where possible will save you a lot of time.
Cleaning the boiler. (pictured below) Was quite a challenge. There were more mould lines than I thought necessary and they also intersected. For extra difficulty the boiler also has a lot of rivets and fine detail that looks like small tubes/ steam pipes. In a way it does make me wish that I was working on a metal model.
Cleaning the legs requires a combination of files and a sharp, but blood thirsty knife. I didn't cut myself, thankfully, the blade was still sharp though.There is Sharp and there is very very sharp. In my personal experience I have found that it is best to use very very sharp blades. A cut heals faster if it was caused by a very sharp blade than a dull one. Needless to say it is best to avoid getting cut even if it means that you have to keep a vial of animal blood handy to keep your knife happy.
The rest pf the parts were a variation on a theme.
In the case of the Frost axe and the left hand i just need to use the knife. the arms themselves were easy as well. and the head barely needed any work. In short it was all down to cutting down the bit where the part was fed and smoothing and "polishing" the rest. The knuckles were a bit troublesome as it is a plastic modes and thus soft compared to a metal piece.

A shot of the pieces all cleaned up. Well with the excess material removed.
Next episode:I will be covering posing for the Juggernaut and also explain what the sticky tack is for.
PS
Please answer the polls at the bottom and leave comments. They are useful for a variety of reasons.
Tuesday, November 2, 2010
Starting out.
So here you are looking at the second post in about a week. Well as this is a blog about painting miniatures I had to step away and take some pictures. Then edit them in photoshop. ( it's what i have on my machine. I use what i have.) But, I digress. So you are reading this and possibly thinking that this had better be a good blog. I can tell you that there is better. though not as often updated. Go to www.brushthralls.com. they have some really nice tutorials. Really. I looked at them myself.
Before I begin please allow me to introduce some friends.
Sam, A Hordes palyer. Prefers the Legion of Everblight.

And Cat, a Warmachine player. Prefers the Cygnaran army.

And of course there is me. I am a member of the Khadoran party. he he he he

Now then. Lets begin.
This blog however is actually geared to people that are in fact just starting out with this new thing called miniatures games. Actually its been around for quite some time, but, once again I digress. Needless to say: Lets start at the beginning.
So what will you need? Well a good lamp to see by and a nice table that you can be comfortable at. I assume you have those as well as the chair. Remember I assume that you are just getting started and don't want to spend on the fancy tools that pros use. Well not yet anyway. I mean, we are talking about $30 + brushes and full spectrum lamps etc. I will talk about those, but lets get started with the basics first. That way you can get the most out of your $30-60 dollar brushes later on in time. (I'm not kidding about the brushes, I looked up the prices and asked my friends in the industry)
So back to the things that you will need. Table, chair, lamp ( you can use sunlight if you have it. I live in the Pacific Northwest so I don't have it available all year.)
Above are the tools I commonly use to clean, assemble and paint my miniatures. They are as follows and in to particular order. Two Cups, one for clean water to dilute paint with and one for cleaning brushes with. Honestly you need any container that can hold water. Then there are the brushes. These usually steal the show, for our purposes I will cover two sizes initially. Just to get you started. Then there is the pin vice. Think of this handy little tool as a hand drill. Actually that is exactly what it is. Its makes assemblyn some models a lot easier, and I will cover its use in a later tutorial. Next up we have the files. The ones pictured above are cut steel files. You can also get diamond files as well, I prefer to have both available. For now, I will cover the cut steel ones as they are more versatile. Well at least in my opinion. The files are followed by the pen knife commonly referred to as an X-acto or scalpel and a pair of clippers. Both of these tools are indispensable when it comes to cleaning your models. Not to mention converting them. Speaking of converting and assembly is included, two part epoxy putty is always handy to have. Its useful when you need to add a little extra detail or to fill in gaps. Then i also recommend Sticky tack, it helps in pre-assembling and posing your model before gluing it together. Speaking of which a good glue is important. For the vast majority of projects I use a cyanoacrylide glue. Err its commonly called super glue, just be careful as it was originally formulated to bond human skin.
And that brings us to the primer and paints. There are numerous opinions as to what primer to use as well as paints, for the sake of brevity I recommend Duplicolor or the P3 brand as the formula is identical (or so I hear) and bonds to metal really well. that and it shrinks quite well and is very durable. As for paints I will be using the P3 range. why not anyone else's? Well again its for brevity's sake and i really really like the P3 line. They come out nice, are reasonably priced and with the exception of the metallic set, are liquid pigment. This is very handy when you want to mix or thin them down.
I can hear you asking about the shiny metal rods and the laptop. Well the rods are used for putting a model together. I will cover them in depth later. And the laptop, well its useful to be able to look up a reference picture online for effects purposes.
Now then. You have your table, lamp and comfy chair all set up. Maybe you have some music in playing. Computers are handy that way.
What are you going to paint?
Well I for one got my hands on the Warmachine Khador Box set by Privateer Press.

And here are the contents:

Starter boxes are a great way to start any army. It Just so happens that Privateer doesn't limit new players to two factions, hence my bias. In case you were wondering.
As I proceed to type I assume that you are reading this for the second time. After you happened to purchase a Starter box of the faction of your choice.
In my next post we will begin with the robot to the right, commonly referred to as a Juggernaut. We will then proceed to the Destroyer next to it and finally finish the set with the warcaster on the left.
Before I begin please allow me to introduce some friends.
Sam, A Hordes palyer. Prefers the Legion of Everblight.

And Cat, a Warmachine player. Prefers the Cygnaran army.

And of course there is me. I am a member of the Khadoran party. he he he he

Now then. Lets begin.
This blog however is actually geared to people that are in fact just starting out with this new thing called miniatures games. Actually its been around for quite some time, but, once again I digress. Needless to say: Lets start at the beginning.
So what will you need? Well a good lamp to see by and a nice table that you can be comfortable at. I assume you have those as well as the chair. Remember I assume that you are just getting started and don't want to spend on the fancy tools that pros use. Well not yet anyway. I mean, we are talking about $30 + brushes and full spectrum lamps etc. I will talk about those, but lets get started with the basics first. That way you can get the most out of your $30-60 dollar brushes later on in time. (I'm not kidding about the brushes, I looked up the prices and asked my friends in the industry)
So back to the things that you will need. Table, chair, lamp ( you can use sunlight if you have it. I live in the Pacific Northwest so I don't have it available all year.)
Above are the tools I commonly use to clean, assemble and paint my miniatures. They are as follows and in to particular order. Two Cups, one for clean water to dilute paint with and one for cleaning brushes with. Honestly you need any container that can hold water. Then there are the brushes. These usually steal the show, for our purposes I will cover two sizes initially. Just to get you started. Then there is the pin vice. Think of this handy little tool as a hand drill. Actually that is exactly what it is. Its makes assemblyn some models a lot easier, and I will cover its use in a later tutorial. Next up we have the files. The ones pictured above are cut steel files. You can also get diamond files as well, I prefer to have both available. For now, I will cover the cut steel ones as they are more versatile. Well at least in my opinion. The files are followed by the pen knife commonly referred to as an X-acto or scalpel and a pair of clippers. Both of these tools are indispensable when it comes to cleaning your models. Not to mention converting them. Speaking of converting and assembly is included, two part epoxy putty is always handy to have. Its useful when you need to add a little extra detail or to fill in gaps. Then i also recommend Sticky tack, it helps in pre-assembling and posing your model before gluing it together. Speaking of which a good glue is important. For the vast majority of projects I use a cyanoacrylide glue. Err its commonly called super glue, just be careful as it was originally formulated to bond human skin.And that brings us to the primer and paints. There are numerous opinions as to what primer to use as well as paints, for the sake of brevity I recommend Duplicolor or the P3 brand as the formula is identical (or so I hear) and bonds to metal really well. that and it shrinks quite well and is very durable. As for paints I will be using the P3 range. why not anyone else's? Well again its for brevity's sake and i really really like the P3 line. They come out nice, are reasonably priced and with the exception of the metallic set, are liquid pigment. This is very handy when you want to mix or thin them down.
I can hear you asking about the shiny metal rods and the laptop. Well the rods are used for putting a model together. I will cover them in depth later. And the laptop, well its useful to be able to look up a reference picture online for effects purposes.
Now then. You have your table, lamp and comfy chair all set up. Maybe you have some music in playing. Computers are handy that way.
What are you going to paint?
Well I for one got my hands on the Warmachine Khador Box set by Privateer Press.

And here are the contents:
Starter boxes are a great way to start any army. It Just so happens that Privateer doesn't limit new players to two factions, hence my bias. In case you were wondering.
As I proceed to type I assume that you are reading this for the second time. After you happened to purchase a Starter box of the faction of your choice.
There seems to be some question as to what to get. I recommend the faction that you think looks the best. Hey they are your models after all.Well that's it for this post.
In my next post we will begin with the robot to the right, commonly referred to as a Juggernaut. We will then proceed to the Destroyer next to it and finally finish the set with the warcaster on the left.
Thursday, October 28, 2010
Welcome.
Welcome to "A brush, a paint and a mini". This is a blog that started as a conversation about miniatures painting. And I decided that since I was getting back into miniatures war gaming and the associated hobby. It would be best to also to start a blog about it, share some tips on painting and track the progress of my friends as they get into the hobby aspect of aforementioned miniatures war games.
I will mostly be discussing cleaning, assembling and painting of individual models as well as whole armies In addition to conversion ideas and custom bases. However this isn't just another painting blog. Mostly because it will aso track the progress of the rest of the members of the group that I affectionately refer to as the "Slow Burn League". A group originally intended to be a slow growth league meeting in Bellevue's Dragon's Layer Comics and games store.
That said there will be plenty of pictures to come as well as links to other blogs on the subject.
I will mostly be discussing cleaning, assembling and painting of individual models as well as whole armies In addition to conversion ideas and custom bases. However this isn't just another painting blog. Mostly because it will aso track the progress of the rest of the members of the group that I affectionately refer to as the "Slow Burn League". A group originally intended to be a slow growth league meeting in Bellevue's Dragon's Layer Comics and games store.
That said there will be plenty of pictures to come as well as links to other blogs on the subject.
Subscribe to:
Posts (Atom)